Best TH12 Attack Strategies & Army Link – 2023
Welcome to CopyCoCBases! Your ultimate destination for dominating Clash of Clans at TH12. Our website is your gateway to mastering the art of TH12 attack strategies and assembling the most formidable armies. Unleash the power of expertly crafted attack plans that ensure victory in every raid. Whether it’s war attacks or pushing trophies, our meticulously curated arsenal of strategies and armies is designed to cater to your unique needs. Elevate your Clash of Clans game with our battle-tested tactics, and reign supreme as you conquer opponents and climb the ranks. Join us at CopyCoCBases and lead your clan to victory, one epic raid at a time!
TH12 Base Layouts
Table of Contents
TH12 Attack Strategies ( Yeti Smash ) :
Strengths: Yeti Smash is a highly effective hybrid attack strategy at Town Hall 12, favored by many players due to its potent combination of Yetis and slinging bowlers. This strategy boasts substantial splash damage, making it capable of overpowering even the toughest Town Hall 12 bases in Clan War and Clan War League.
Phase 1 – The Funnel: Establishing a strong funnel into the core is essential for the success of Yeti Smash. Without a proper funnel, Yetis and Bowlers tend to wander around the base’s perimeter, compromising the attack. Begin by deploying your Grand Warden with 5 Healers on one corner of the base, accompanied by Loons to trigger any Air Mines. Drop your Barbarian King and Siege Barracks on the other side to create a path to the core. Use a Rage Spell to sustain the Warden if necessary, and employ a Baby Dragon to fine-tune the funnel if needed.
Phase 2 – SMASH!: Utilize two Jump Spells to path your troops into the core. Drop your 7 bowlers, followed by 7 Yetis and Archer Queen, leading them to the first Jump Spell. Once they breach the walls, deploy a Rage Spell and a Poison Spell to deal with defending Clan Castle troops. Use Wizards and Minions to clear out trash buildings.
Phase 3 – Cleanup on Aisle 12: In Phase 3, activate the abilities of your Archer Queen and Grand Warden and deploy remaining Spells as needed. Consider using the Freeze Spell on high-value targets like multi-target infernos, Eagle Artillery, or the Giga Tesla.
Where It Can Go Wrong: Failure to properly funnel your army into the core during Phase 1 can lead to a failed attack, resulting in a low star count. It’s crucial to ensure that your Bowlers and Yetis reach the core to maximize the attack’s effectiveness.
In Clash Fanatic Conclusion: Yeti Smash’s significant splash damage makes it a formidable strategy against maxed Town Hall 12 bases in Clan War and Clan War League. Practice the attack with Friendly Challenges to master Phase 1 funneling and maximize its potential.

TH12 Attack Strategies ( P.E.K.K.A. BoBat ) :
Strengths: P.E.K.K.A. BoBat is a highly effective attack strategy at Town Hall 12, capable of overwhelming even max-level bases when executed correctly. This strategy relies on a well-planned funnel and precise timing of Freeze Spells to unleash a devastating Bat Wave onto the base.
Planning The Attack: Identify the entry line closest to Wizard Towers, multi-target Inferno Towers, and the Eagle Artillery, as these defenses pose the greatest threat to your Bat Wave. Aim to eliminate 2 Wizard Towers, 1 Inferno Tower, and the Eagle Artillery during the attack.
Phase 1 – The Funnel: Establish a strong funnel to guide your P.E.K.K.A.S. and Bowlers into the base. Use a Warden Walk on one corner to clear one side of the funnel, supported by a Rage Spell. Deploy a Baby Dragon and Barbarian King on the opposite side to create the other half of the funnel.
Phase 2 – Kill Squad: Deploy all P.E.K.K.A.S followed by the Wall Wrecker, Bowlers, and Archer Queen to form the kill squad. Ensure the Wall Wrecker penetrates deep into the base to maximize value. Use the Eternal Tome ability to protect the Wall Wrecker and drop Rage and Poison Spells as needed.
Phase 3 – BAT WAVE!: Use Bat Spells to unleash a Bat Wave onto the base, supported by Freeze Spells to neutralize Wizard Towers and multi-target Inferno Towers. Drop the Ice Golem to tank for a Wizard Tower, while the Bat Wave focuses on destroying defenses.
Phase 4 – Cleanup: Utilize remaining troops to clear out trash buildings for a quicker cleanup process.
Where It Can Go Wrong: Failure to properly funnel the kill squad into the base and not timing Freeze Spells correctly are critical points of failure for P.E.K.K.A. BoBat. Ensuring both aspects are executed correctly significantly increases the chances of a successful attack.
In Clash Fanatic Conclusion: While challenging to execute, P.E.K.K.A. BoBat is a rewarding strategy capable of securing three stars against Town Hall 12 bases in Clan War League. Practice and precise timing are key to mastering this attack strategy.
TH12 Attack Strategies ( Electro Loon ) :
Strengths: Electro Loon is an effective and straightforward attack strategy against max level Town Hall 11 and 12 bases, particularly those that are tightly-packed. The simultaneous deployment of 8 Electro Dragons unleashing Chain Lightning can lead to devastating destruction.
Phase 1 – Ground-based Kill Squad: The Kill Squad’s objective is to take down 2 Air Defenses using the Wall Wrecker, King, Queen, and a Rage Spell. Deploy the Wall Wrecker to breach walls near two Air Defenses, followed by the King and Queen. Trigger their abilities as needed to withstand heavy damage. Use a Rage Spell to boost their efficiency.
Phase 2 – Send in the Electricity!: Deploy 8 Electro Dragons and 8 Balloons closest to the remaining Air Defenses. Start with the Electro Dragons to tank damage, followed by the Balloons and air-targeted Grand Warden.
Phase 3 – Spells and Tome: Use Rage Spells to push your army into the core quickly. Freeze any threats like defending Clan Castle troops, Air Defenses, or Inferno Towers. Activate the Grand Wardens’ Eternal Tome ability once your troops converge. Continue using Rage and Freeze spells strategically.
Where It Can Go Wrong: Electro Loon may struggle on bases that are too spread out, as the slow Electro Dragons may not reach their targets efficiently. It’s crucial to quickly take down Air Defenses in Phase 1 to prevent them from sniping your troops.
In Clash Fanatic Conclusion: Electro Loon excels on bases with buildings spaced closely together, maximizing the effectiveness of Chain Lightning. With proper execution, including timely spell usage and Air Defense takedowns, this strategy can secure a 100% 3-star victory.

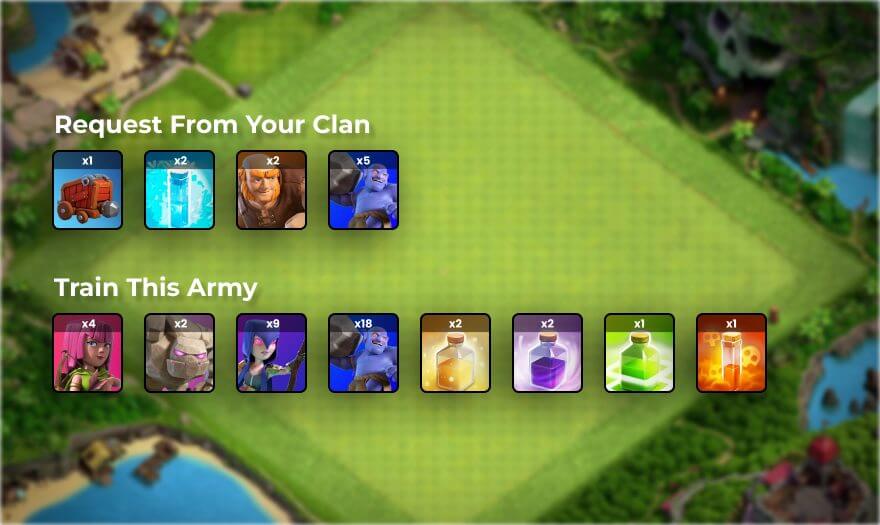
TH12 Attack Strategies ( Shattered BoWitch ) :
Strengths: Shattered BoWitch is a modern adaptation of a classic Clash of Clans attack, featuring more firepower and a Wall Wrecker for enhanced offense. While it may face challenges against stronger Town Hall 12 bases, it’s highly effective against Town Hall 11s.
Phase 1 – Deployment Line: Establish a deployment line about 7 buildings wide on the far end of the enemy base, away from the Town Hall. This allows the Wall Wrecker to take down as many buildings as possible before exploding.
Phase 2 – Kitchen Sink!: Deploy all troops in a “kitchen sink” strategy. Place a Golem on each end of the deployment line, followed by 9 Witches and 18 Bowlers across the line. Then, deploy the Wall Wrecker and all 3 Royals in the center to create a funnel.
Phase 3 – Spells and Abilities: Use Rage Spells to boost damage output as troops converge. Deploy Heal and Poison Spells when engaging enemy Clan Castle troops. Activate Grand Warden’s Eternal Tome if needed. Utilize remaining spells to guide troops and use Royal abilities to sustain their health. Use Archers for cleanup.
Where It Can Go Wrong: Success hinges on getting the Archer Queen into the base’s center. If she strays outside, enemy Clan Castle air troops can easily disrupt the attack.
In Clash Fanatic Conclusion: Shattered BoWitch overwhelms defenses with a horde of Skeletons from Witches and flung rocks from Bowlers. By leveraging tanks and distractions, it secures consistent 3-star War attacks.
TH12 Attack Strategies ( Lavaloon Wrecker ) :
Strengths: Lavaloon Wrecker is a high-skill attack that, when executed patiently, can dismantle top Town Hall 12 bases with ease. This strategy combines a Wall Wrecker Kill Squad with a massive deployment of Level 8 Balloons, supported by Rage and Haste Spells for swift destruction. Due to its reliance on the Wall Wrecker Kill Squad, it’s categorized as a Hybrid attack rather than purely Air.
Phase 1 – Wall Wrecker Kill Squad: This phase is crucial for success. The goal is to eliminate defending Clan Castle troops and the Archer Queen. Deploy the Wall Wrecker and two Baby Dragons to funnel troops toward the core. Follow up with your King and Queen behind the Wall Wrecker. Use Rage and Poison Spells to aid the Kill Squad. Monitor the Queen’s health closely and activate Royal abilities when necessary. By the end of this phase, aim for 25-35% base damage with no remaining defending troops.
Phase 2 – Classic Lavaloon: Execute this phase similarly to Lavaloon attacks at lower Town Hall levels. Deploy Lava Hounds to tank and Balloons for cleanup. Focus on reaching the core quickly, preferably where the Eagle Artillery is located. Use Lava Hounds to target Air Defenses and deploy Balloons accordingly. Place the Grand Warden behind the Balloons to support them.
Phase 3 – Spells and Cleanup: In this final phase, guide your army to the core with Haste Spells. Drop a Rage Spell and activate the Grand Warden’s Eternal Tome before facing significant defenses. Use remaining spells to support your troops as they clear the base. Employ Minions and Archers for cleanup.
Where It Can Go Wrong: Failure to eliminate defending Archer Queen and Clan Castle troops in Phase 1 significantly reduces the attack’s success rate. Rushed spell deployment in Phase 3 may leave troops vulnerable to defenses.
In Conclusion: Mastering Lavaloon Wrecker requires practice, especially given the strength of Town Hall 12 defenses. Utilize Friendly Challenges to refine timing and execution. With patience and practice, this attack can reliably secure 3-star victories against max-level Town Hall 12 bases.